Managing participants allows you to follow all the orders placed for the event, regardless of their origin (online, printed tickets, manual orders, box offices, etc.)
Log in to your account and join the event of your choice. Click on the menu Attendees > Manage attendees to:
- view the details for each attendee
- edit information entered by buyers
- return / download tickets
- send back / download invoices
- download the list of attendees by status / ticket type
- export the database
- etc.
The attendee management interface is a comprehensive order tracking tool:
1. Look for an attendee
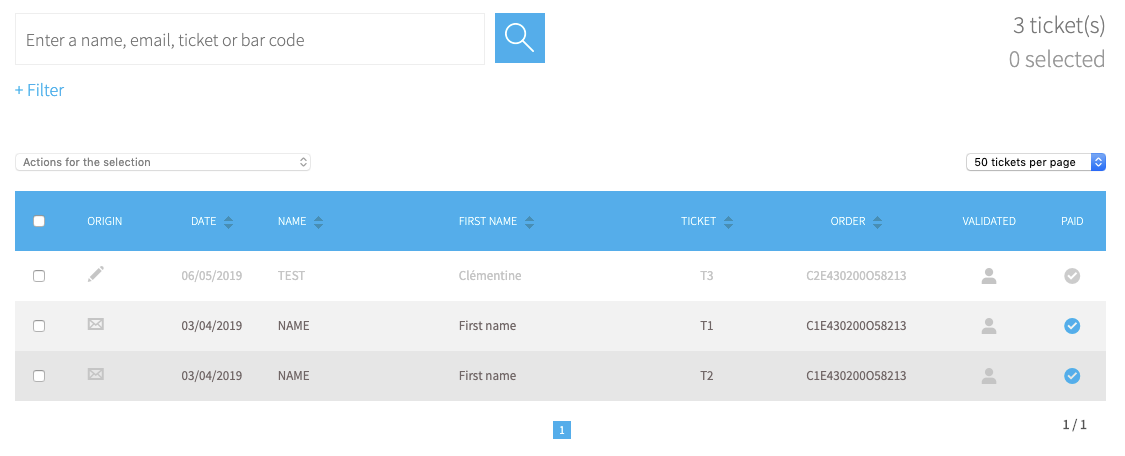
Use the search bar to easily access the order you are looking for. You can enter: a last name, a first name, an email address, a ticket number or a barcode.
Then click on the search button.
You can also click on "+ Filter" to refine your search
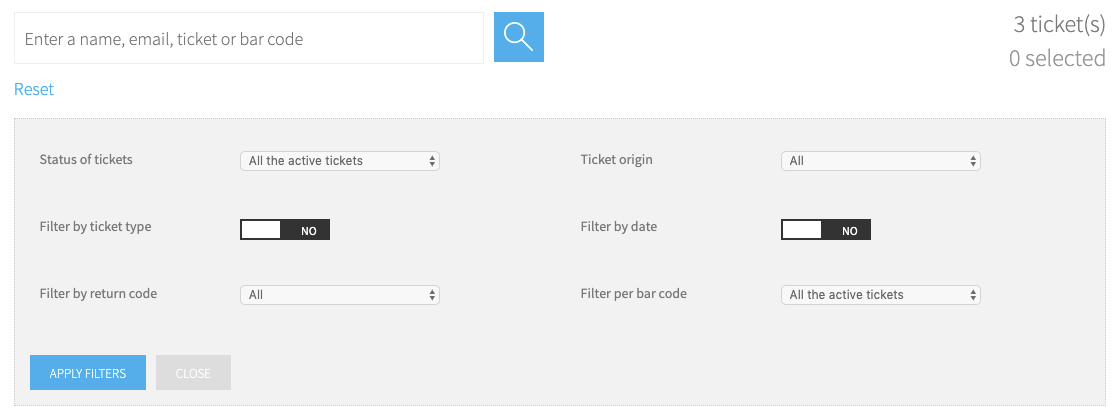
Activate the filter of your choice and click on the Apply filters button to filter the list of orders according to the criteria entered.
1.1 Ticket status
- Paid: tickets paid online by bank card, or offline by check, cash or other (payment of reservations, order through box office, manual entry, etc.).
- Unpaid: online or box office booking, manual entry not yet paid by the buyer. You can send reminders about your payment instructions to your customers and convert the reservation into a paid ticket once the payment has been received.
- Never checked-in: tickets that have never been scanned on the day of the event
- Deleted: Tickets deleted from your attendees database, they will be unknown to access control. You can restore the ticket at any time
Important: Deleting a ticket does not lead to the refund of the bank card used by the buyer to pay for their order. This is not automatic. For more information on refunds, please click here. if a participant made a mistake when ordering. If this is due to an event cancellation, please read this dedicated article instead.
1.2 Ticket source
- Online: tickets paid online by bank card and reservations done through the widget when the option is activated (Configure> Ticketing options)
- Box office: tickets entered via the interface kiosk.weezevent.com
- Manual entries: Orders entered via the back office of the event (menu Track > Enter Order)
- Invitations: Tickets sent using the Invitations feature (menu Communicate > Invitations)
- Stock Printing: batches of pre-printed tickets, counted in the turnover of your event. They are generated from the menu Selling > Stock printing
- Distributors: You can import tickets sold via resellers networks (Fnac, Digitick, Tickenet or other). They will then appear in your order management interface and in the event database for access control.
1.3 Filter by form
View the tickets based on the response entered by the buyer in the form.
Choose the relevant field in your search and the type of value to display (e.g. equals ...).
1.4 Filter by date
Use this option to display orders placed on a particular date or period.
2. Download the list
Click on this button to export the list of attendees and thus retrieve the data of each order: last name, first name, e-mail, answers to forms, etc.
If display options have been selected, the list to be exported will be filtered according to the selected criteria. For example, you can display a single ticket type and then download the PDF list of the names of the people who ordered that ticket type.