Don’t forget to add your ticketing module to your website! We strongly recommend that you dedicate a page of your website to your event’s ticketing. It should be easy to access for your customers and contain all the basic info (FAQ).
Your Weezevent ticketing can be directly integrated to your website, so as to make the customer journey easier and blend into your visual brand identity. This article explains how.
1. Ticketing page
1.1 Your module
Weezevent’s sale module is an iFrame widget. If you are planning several events and would like to display the whole programme, we recommend that your read the article on how integrate a multi-event widget.
Your sales module’s iFrame code can be directly generated from your management interface by going to the menu Sell > On your own website.
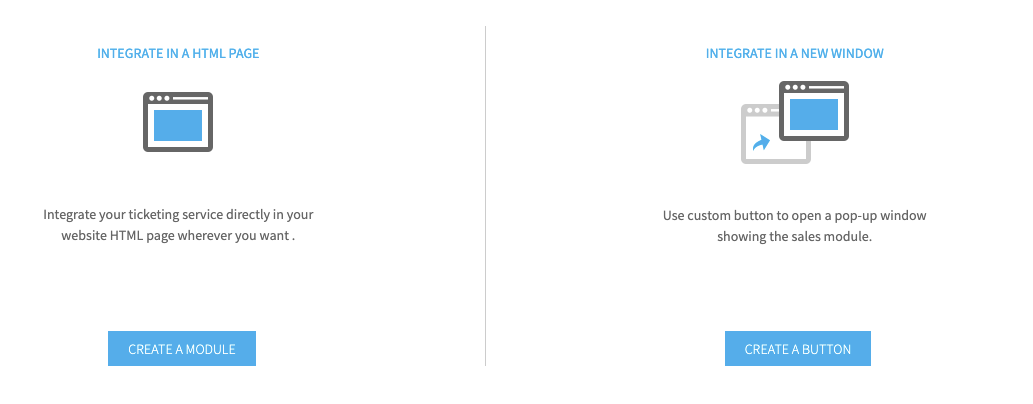
Integration to a page (iFrame)
When iFrame is integrated to a page, the attendee follows the various steps (ticket selection, form and check-out) to register and pay online from your website.
The benefit to you is leveraging the traffic generated by your website and enabling the buyer to finalise their order without being redirected to a third-party website.
You can customize the module’s main color, default display language and size.
To see a sample of a page integration (using iFrame), please click here.
Integration using a pop-up window
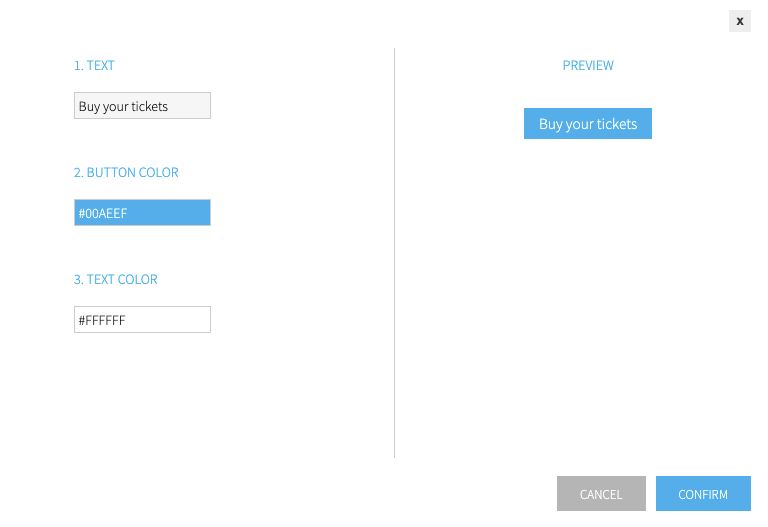
You can also create a ticketing button that will open the sales module in a pop-up window.
You can customize the text as well as the color of the module and the button. Click on Submit to generate the html code.
We also offer some sample buttons that you can use for free:
|
ONLINE TICKETING |
|||
|
BUY YOUR TICKETS |
|||
|
TICKETING MODULE |
1.2 Welcome container - Width
Minimum: 550px
Recommended minimum: 800px
1.3 Welcome container - Height
Height should not be restricted (our widget should be able to push the bottom of the page downward!)
Widget height can be adjusted by clicking on Creating a module.
Don’t hesitate to activate the automatic adjustment of this setting to optimise integration and avoid scroll bars.
1.4 Welcome container - Content
You should leave is page as blank as possible, because:
- the higher the placement of your sales widget the more sales you will make
- the module can be long, any information placed below may not get read
2. Landing page
We recommend that you make access to this page as clear as possible. Here are 2 solutions that can be combined:
1 – A TICKETING title at the top (necessary)
Example:
2 – An image link BOOK YOUR TICKETS to the right or left (optional)
3. Concert pages
Internet users should be able to buy their ticket directly after reading the event information. To set this up, here are 2 options:
1 – A single BOOK or BUY YOUR TICKET link on each concert page
Example:
Benefit: A single URL means that you are done once your website is launched.
Downside: Buyers can have difficulties finding the one show they were reading about when they land on your TICKETING page
2 - A 650 x 600 space where you will add a module for the event
It is necessary that you are able to add iFrame code to each page yourself.
Example: 
Benefit: no one can get lost, your conversion rate is optimised
Downside: this requires a bit more work on your part, meaning a copy&paste for each new show
4. Specific CMS integrations
Click on the links below to integrate on: