Create and Configure a Cashless Item
Creating items and item categories is specific to each entity.
Examples:
- I’m creating my "Soft drinks", "Wines", etc. items in my "Bar" entity
- I’m creating my "T-shirts", "Hats", etc. items in my "Merchandise" entity
Once logged into your cashless account, click on the relevant event > Configuration > Products
1. Create an Item Category
An item category allows you to:
- organise your items
- find items more easily when creating cash register keypads
First, you need to choose the entity (at the top right) for which you want to create items and item categories.

If you haven't created any activities yet, check out the dedicated article to learn more.
Once you're in the entity of your choice, click the downward arrow next to Add product and select Add category from the dropdown menu. Give your item category a name and click on Create a category to save.

Please note:
- You can also import a category from another event if the same items are available (by clicking on Import an existing category).
- The system requires that each item be linked to a category, which you can also create when setting up the item.
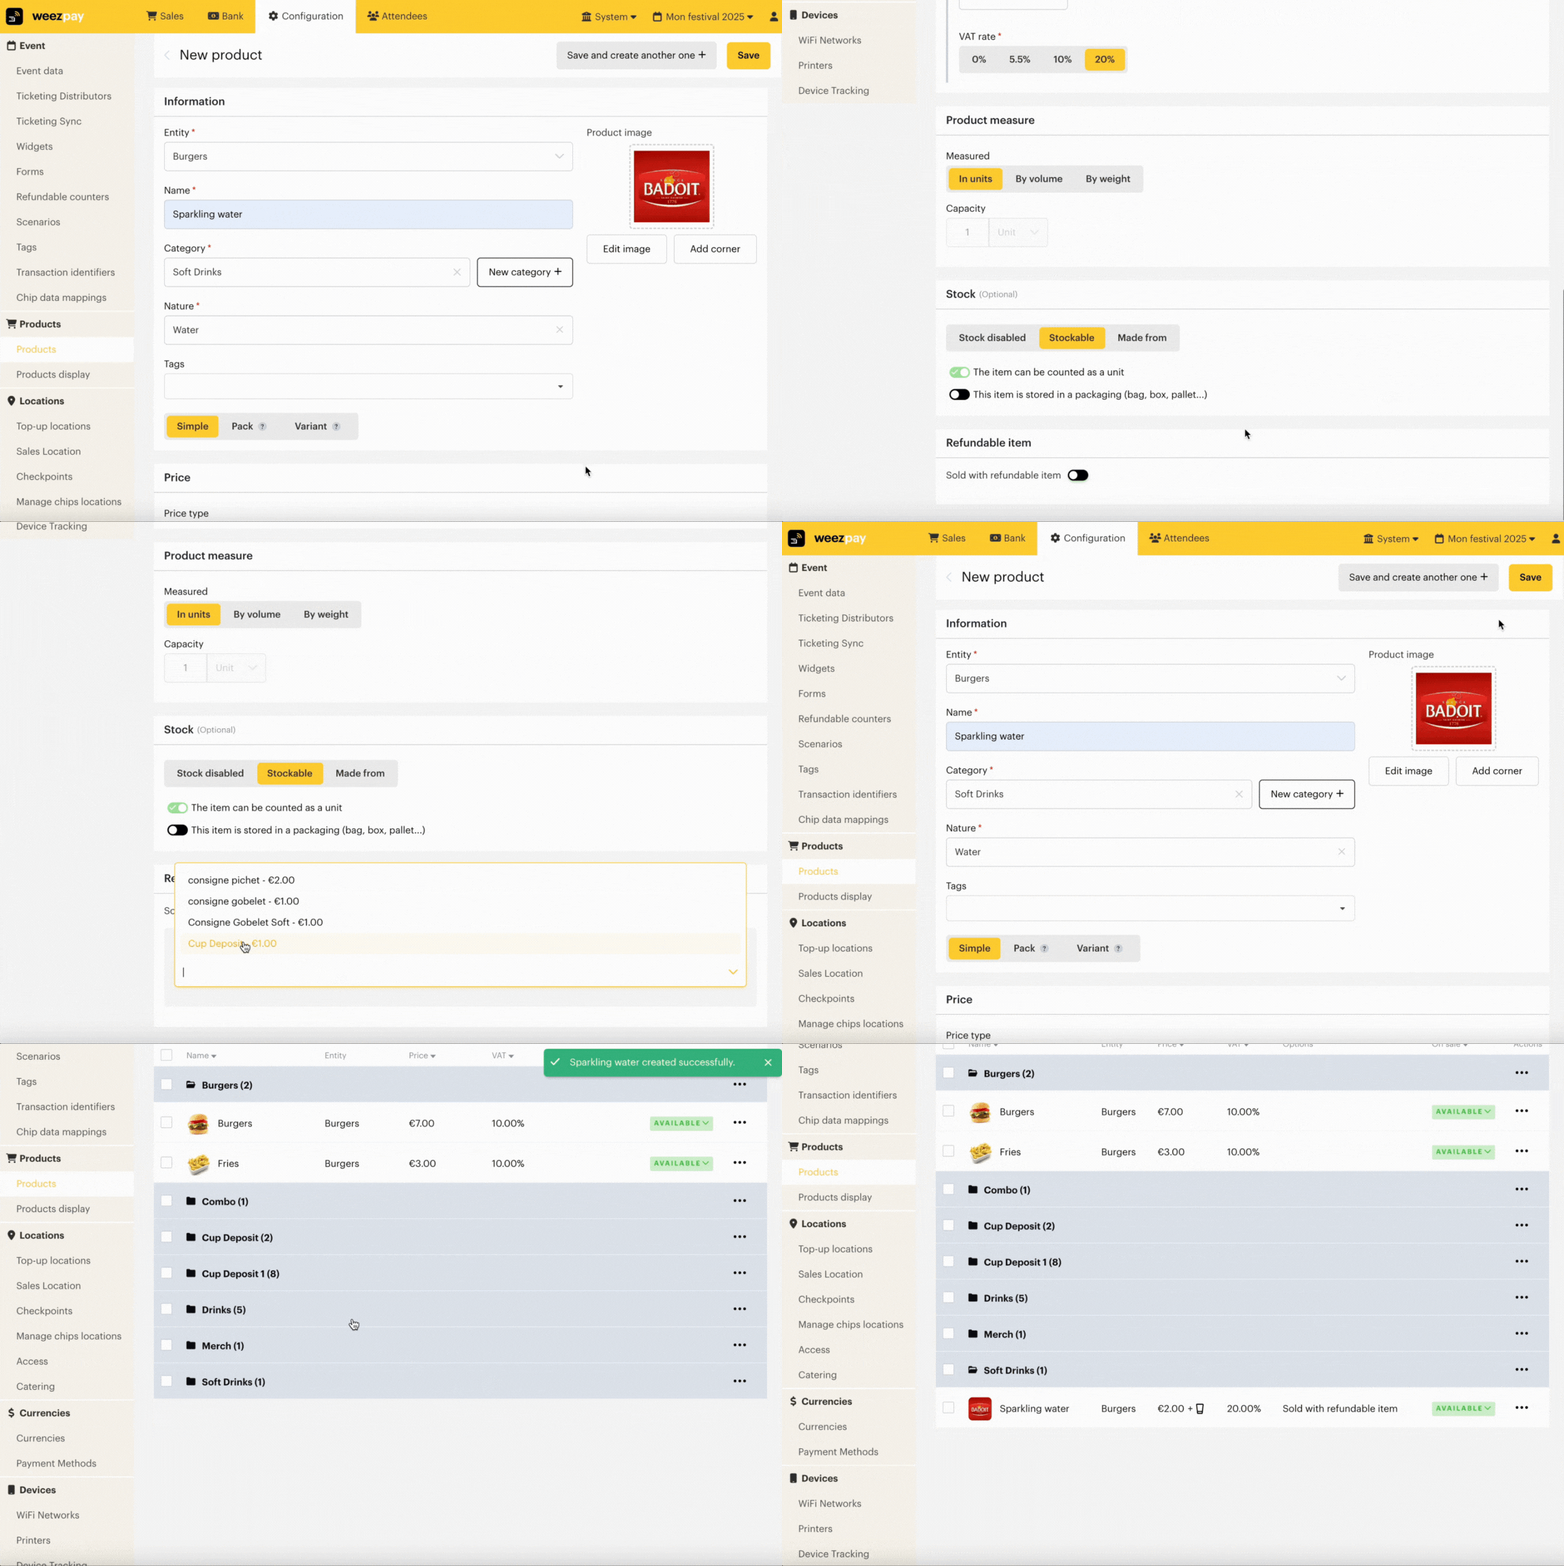
2. Create an Item
Once you have created your first category of items, you can then create the different items of your event by clicking on "New" then "item".
You will now be able to set specific parameters for each item.
|
Item name |
It will appear on the sales terminal and on your various sales exports |
|
Item category |
This is the (previously created) category to which you want to link your item |
|
Item image |
It is very important to assign an image to your item. During the event, this image will help the sales team find their way around the sales terminal.
|
|
Nature |
This refers to the type of item you are offering (drink, food, cup, merchandise) as well as the subtype (for example, beer, wine, soft drink, etc.). |
|
Tags |
They are created beforehand and help you organise your items for easier identification — for example, by adding a tag indicating that an item is not allowed for minors. |
|
Price |
You can set the price of your item in 2 different ways:
|
|
Item options |
Please check that the "Available for sale" box is ticked for the item to be sold using the sales terminal. All other options are detailed below. |
|
Product measure |
Indicate whether your item is measured by unit, volume, or weight. |
|
Deposit / refundable items |
Refer to section 3.3 dedicated to deposits for more information. |
3. Your Item’s Specific Options
All these options are available to you when creating or editing your products.
3.1 Combined Items
Note : The items you want to add in your pack have to be created beforehand
Example: I’m selling burgers, fries and Cheeseburger + fries combos:

Item pack configuration:

This setting allows you to know exactly how many cheeseburgers and portions of fries you sold, even though some were sold as part of a pack.
3.2 Variants
In the case of item variations at the same price, it is possible to create variants.
Example: I created 1 "T-shirt" item and 3 variants for the different sizes S, M, and L.

On the sales terminal, click once on the main item "T-shirt", then the size choice will appear. This makes it possible to reduce the configuration of your items and the rendering on the sales terminals.
Click on Save to finalise the creation of your item. You can change the settings at any time.
3.3 Deposit Management
In some cases, it is necessary to sell products with a deposit.
The admin or your Weezevent project manager must first authorise the addition of deposits for the relevant activities
Example: I always add a deposit for the cup when I sell drinks
To set the deposit:
In the product management page, create a new deposit item at the desired price. Click on Refundable items > +Add new refundable itemThe credit is created automatically and can be renamed for greater readability.

To link the deposit to your items, you can:
- either edit the relevant items, then click the Sold with refundable item box and select the deposit. The price incl. deposit is then displayed.

- or select the relevant items, then click on Action on selection > Sell with refundable item and select the deposit of your choice.
4. View Your Items
All created items appear in tabular form in Configure > Products

For each item, you can:
- edit the settings (by clicking on the item)
- delete it if no sale has been done made for this item (by clicking on the three dots next to it > Delete)
Pro Tip: You can duplicate items. To do so, tick the item(s) box(es) > Action on selection > Duplicate. You can also click on the three dots next to the item > Duplicate. You can now select the activity and item category where you would like to duplicate your item.
Option 1:

Option 2:

Once your item categories and items are created, you can set up your cash register keypads.