Emails are the key to the campaigns proposed by WeezTarget. Consider customising your communications with the help of email campaign templates.
To design an email, you can choose from the following options:
- Use a generic template provided by WeezTarget. A dozen templates are available to you, and you can change them as you wish.
- Use a template that you’ve already used in a previous campaign. It’s easy — all you need to do is click on a template and change it; it will be automatically saved.
- Start from a blank page and design your own template. This is easy, thanks to the email design too.
1. Using a Generic Template
A dozen generic templates are already available on WeezTarget:
- Newsletter - type 1
- Newsletter - type 2
- Opening of the ticketing service
- Scheduling announcement
- Quick, early bird tickets are sold out!
- Your promotion code
- How to get to the event
- Last-minute information
- Thank you for registering
- Refund and cancellation of your ticket
When you choose a generic template, the email editor will load the content (text and image) of the chosen template. You can change the already existing content as well as dragging & dropping image or text blocks as you wish. Everything is customisable in this generic template!
1.1 Choose a Generic Template
- Generic templates are available when creating a new campaign: Communications > Campaigns > Create a campaign > Design
By clicking on a template, you will enter the editing mode for this template

1.2 Add Content
You can make changes to all of the proposed template’s content, including the subject, title, text, image, buttons, separator, etc.
In the left-hand panel with the black background, you will find all the content blocks that you can use. Drag & drop each block from the left-hand panel to the email content on the right.

Once you have finished dragging & dropping, you can change the content of each block by clicking on it in the right-hand panel. You will then be able to change its content in the left-hand panel.

- Image: Choose the images that suit you from your personal library; you can delete or duplicate them at any time. You also have the option of inserting a link (when you click on the image, it will redirect you to the URL that you have specified).
- Text: Use the typefaces provided to customise your email’s rendering; these typefaces are compatible with all mailboxes. You can put certain parts of the text in Bold, Italics or Underlined to make the information more readable, and you can also change its colour and size. By default, the text is in Arial, 14px, black.
- Separator: Its colour, thickness and type (continuous or dotted) can be changed according to your needs. By default, the line is grey, 1px, continuous.
- Button: Put a URL link in Button link > URL (e.g. https://weezevent.com/en-gb/). You can customise the button’s background and text colour, as you can the text. By default, the button has a blue background, white text, and the text: “Button text”
- WeezTool: block allowing the insertion of a footer indicating the contact email of the organisation and a link allowing the contact receiving the email to unsubscribe. You can also add this block to display the “See online” mirror link, or icons to direct users to your social networks.
- Columns: allows you to arrange the content of your email in several columns (2 to 4). This facilitates reading, and allows you to highlight specific items of information (e.g. image, text, button)
- The plus: a pre-created structured block allows you to easily add an image, text, or a button:

1.3 Save
You can save the changes you have made to your template at any time.
Click on Save in the bottom-right corner to save your work.
This template will then become one of your customised templates, which you can retrieve via Communications > Templates.
2. Using one of Your Templates
If you have already customised a template for one of your previous campaigns, you can start from this template.
All your customised templates can be accessed via Communications > Templates.
It’s easy to duplicate a template — just click on one and make the desired changes. It will be automatically saved as a new template.
Managing content is identical to what is described previously in this article concerning generic templates (steps 1, 2 and 3).
3. Using a Blank Template
When you choose a blank template, the editor will be completely empty. You can therefore drag & drop image or text blocks to create a world of your own.
To create an empty template, create it from a campaign: Communications > Campaigns > Create a campaign > Design > Empty template.

Managing content is identical to what is described previously in this article concerning generic templates (steps 1, 2 and 3).
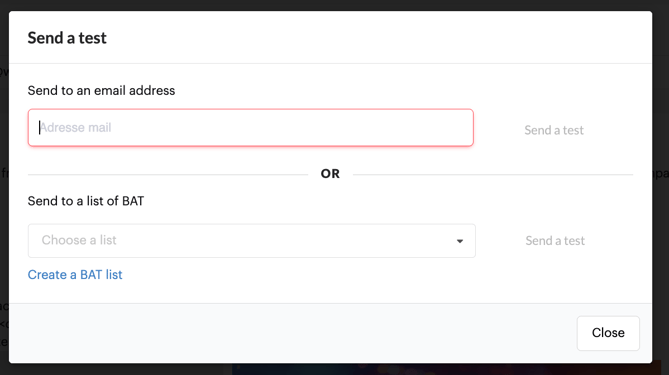
4. Sending a Pass For Press (PFP)
Before sending your campaign to the contact groups you have identified, you can check your email’s content and appearance, or have it checked, by sending a test.
This Pass For Press (PFP) is available by clicking on Send a test on step 3 of the campaign creation/editing process.

- Enter the email address to which you wish to send your test
- Alternatively, you can create a list of email addresses to which you can send your test emails. To do this, click on Create a PFP list, then enter the name of your list and the email addresses associated with this list.
- If you have already created a PFP list, this is directly available via the insert
- Click on Save to send the test
- You can repeat this operation as many times as you wish to make sure that you are pleased with your content, on all devices (e.g. computer, phone, tablet, etc.) and navigators.
5. To go Further
By default, your emails are sent with one of the 5 email addresses that we offer. The reply address is that of the linked organiser account.
If you wish to personalise your delivery and reply addresses, find out how to do so here.