Our WeezAccess Pro device (also called WAP) uses the WeezAccess app (free download on the Appstore and Google Play Store) and allows you to control your event tickets using an integrated barcode reader.
When an Internet (Wi-Fi) or 4G connection is available at the event location, the control data is synchronised between the server and each connected device. An automatic update is performed every 30 seconds, allowing WAPs to synchronise with each other. Tickets sold on site using the ticket office and online at the last minute will be recognised by your WAPs.
You can use several devices simultaneously. If the Internet connection is interrupted, you can continue to check the tickets since there is no need to be connected to a Wi-Fi network to scan the tickets. Synchronisation will be done when the connection is available again.
If you would like to see a preview of the device, please click here.
Have you rented or purchased a WeezAccess Pro terminal? Follow this user guide to start controlling access to your events!
The paper version is available here. We recommend that you print it to have it on hand, if needed, at the event. It includes the number to the hotline you can contact in case of technical emergency on evenings and weekends.
1. Connect to the Internet (Wi-Fi)
|
The WeezAccess Pro terminals require an Internet connection only when uploading the control data. Go to settings > Wi-Fi to detect the network of your choice and log into it using your password.. |
|

2. Log into your Weezevent account
|
Click on the WeezAccess app icon at the bottom of the screen. Please note that, to log in, you must create an operator in the Access Control section of your account, accessible from Tools > Access Control > Operators Data upload from all your active lists starts as soon as you log in. Please note: if you see several WeezAccess icons on your WAP, please click on the black icon. |
|

3. Select your list
|
Select the control list(s) you will need to control access to your event then click on “upload”. To find out more about the control lists, see our dedicated article. Please note: you can create specific control lists from your Weezevent interface from the Tools > Access control > My lists section |
|

4. Control your tickets
4.1 Validation modes
|
|
Scan mode |
Touch the screen or press the side button to trigger the laser. Place the ticket perpendicular to the device and aim for the centre of the barcode. The distance between the ticket and device must be 5-20 cm. Feel free to get the device closer and further from the ticket for a quicker scan. |
|
|
Entry mode |
Click on “Entry” in the menu at the bottom of the app and enter the barcode number printed on the ticket. Then click on “submit”. The ticket status appears. |
|
|
List mode |
Enter an attendee’s name or the beginning of the name in the search field and click on "Search". Scroll through the list if necessary and click on the corresponding line. Click on “IN” to stamp the ticket when the attendee is looking to get in, or “OUT” if the person is leaving the event. |


4.2 Synchronisation
|
If your WAP is connected to the Internet, synchronisation is automatically done at the frequency you have set in the settings. It is set to 30 seconds by default. You can reduce this time to 5 seconds, however please be aware that it uses more battery. |

|
|
The dot on the bottom left of the screen lets you know about the device’s synchronisation status:
|
4.3 Status of the tickets
|
Valid ticket |
Ticket already scanned |
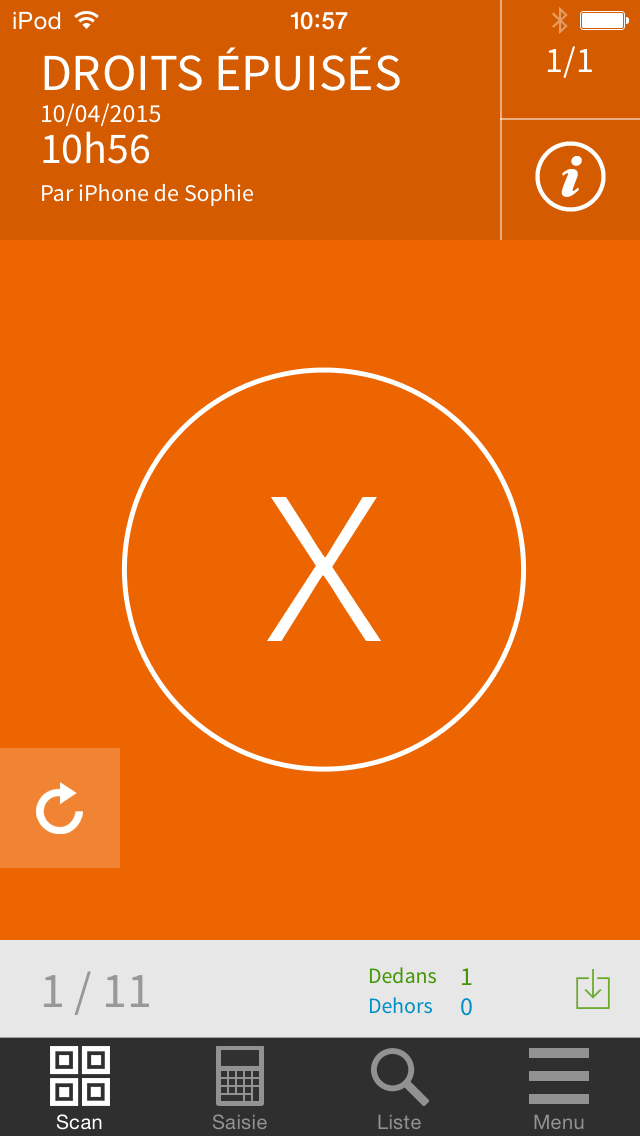
Unknown ticket |
|
The ticket is valid and has been stamped. The last name, first name and price appear. |
The ticket has already been scanned. The time and name of the mobile phone that scanned it are displayed. |
The ticket does not appear in the list uploaded to the device. |
|
|
|
|


5. Additional features and options
Click on the Menu icon at the bottom right to access the following:
|
|
Session information |
Allows you to check the selected attendees list, the operator ID used to log in and the name of the control device. |
|
|
Statistics |
Displays detailed stats of the checked tickets allocated per categories and sub-categories |
|
|
Advanced settings |
Access the app's advanced settings: synchronisation frequency, input/output mode, pairing mode, sound notifications, etc. The "entrance" mode (IN) allows you to stamp the tickets to let the attendees in (default mode). The "exit" mode (OUT) allows you to manage the exit of visitors. You can switch from one to the other. Note that the exit mode is optional. By enabling it (Scan exits) the device will only scan in "exit" mode, and by disabling it the device will return to "entrance" mode. |
|
|
Diagnostics |
Click on this button to display the WeezAccess version you are using, the status of the Wi-Fi, the device’s battery, whether linea is detected, connected, has battery, etc. |
|
|
End control |
Click this button to end your scanning session (see section 6 for more details). |
Pairing mode
This allows to scan a second barcode to pair it to an attendee. Example: for running races, a bib needs to be paired with each runner by first scanning their e-ticket, then the pairing barcode.
|
Step 1: Scan the attendee’s e-ticket |
Step 2: Pair the second barcode |
|
|
|


6. Additional features and options
Auxiliary charger
This charging mode enables you to charge the iPod using the battery of the barcode reader when the iPod’s battery is low. To switch to that battery, go to the WeezAccess app then Advanced settings > auxiliary charge.
Please note: The iPod’s light and bluetooth are energy-consuming apps. If you need a light, we recommend that you use an external light rather than the iPod’s. If it is on, you can turn it off by scrolling down the menu located at the bottom of the screen and clicking on the torch light symbol at the bottom left.
Scanning with USB cable
This option enables you to use the barcode reader while the device is charging.
7. End control
|
When the check is complete, click on "End control" in the bottom right Menu.
|
|

Two scenarios are possible:
- The device is connected to the Internet: click on "Synchronise and close" to update the latest data and close the scanning session.
- The device is not connected to the Internet: log in and repeat the operation. You cannot exit the app without synchronising the scanning data (no risk of data loss). Synchronisation will be done when the connection is available again.
8. Troubleshooting
|
I cannot log in |
Check that you are connected to the Internet. Check that your email and password are correct. |
|
The app is frozen |
Force the app to close by double-clicking on the main iPod button and sliding the window up, then restart it. |
|
Data does not sync |
Check that you are connected to the Internet. Check your sync frequency settings in “Settings”. |
|
I cannot see my list in the app |
Check that your list is active and not archived from the Weezevent back office |
|
The barcode cannot be read |
Slowly move your device closer and away from the barcode. Centre the barcode on the screen. If this still does not work, manually enter the barcode using the "Entry" mode or search for the participant in "List" mode. |
If you have purchased a WeezAccess Pro device and wish to change the Apple ID, please follow these steps:
- From your iPod’s main menu, click on Settings > iTunes Store and App Store
- click on the email wap@weezevent.com
- click on logout
- Enter your own AppleID and password