Go here to rent your Weezevent ticket office.
1. Pack contents
2. Installing the equipment
3. Connect the WeezBox to the Internet
4. Connect to your Guichet
5. Run print tests
Appendix 1: Connection to the WeezBox interface
Appendix 2: Using a Zebra printer
Appendix 3: Using an Evolis printer
1. Contents of the pack
When you receive your parcel, your counter will consist of :
- WeezBox + power cable
- Thermal printer + power cable + USB cable
- The consumable chosen (counterfoil, roll, labels, card)
- (optional) An iPad or other tablet/computer.
- Any terminal capable of displaying a website is functional.
The counter can be accessed at the following address: https://kiosk.weezevent.com
2. Installin g the equipment
The equipment must be connected according to the diagram below:
.png?width=602&height=248&name=image%20(6).png)
3. Connecting the WeezBo to internet
Network configuration
The network on which you are going to connect your counter must accept the following protocols and ports:
- Protocol web socket over TCP
- port 443
However, this configuration is still very common and your network should allow it "by default".
For reasons of stability and optimum performance, we recommend that you use your WeezBox via a wired network (Ethernet). Connection via a WIFI network is also possible.
Cable connection
- Make sure that this cable provides access to the Internet.
- Plug the cable into the network socket on the WeezBox.
WIFI connection
No captive portal (no identification portal)
The wifi network can only be configured using a standard connection (SSID + WPA/WPA2 password).
- Connect to the WeezBox interface (see Appendix 1).
- Choose your network and enter the network password.
.png?width=602&height=323&name=image%20(7).png)
The blue pictogram indicates that you are connected to this network.
.png?width=602&height=219&name=image%20(8).png)
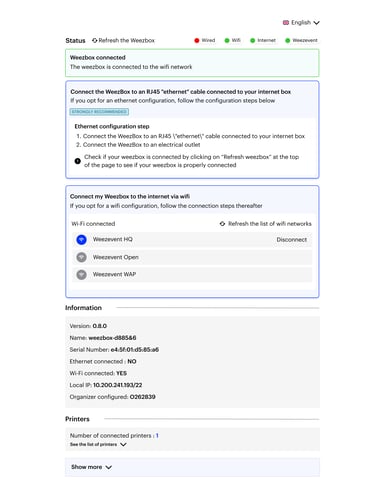
Check that the WeezBox is connected to the Internet
- Connect to the WeezBox interface (see Appendix 1).
- Check the status bar at the top of the page
Ethernet : connected by cable
- WIFI : connected by WIFI
- Internet : connected to the internet
- Weezevent : connected to the Weezevent servers
- Check the status of the top banner is green as below.
.png?width=593&height=80&name=image%20(9).png)
If the banner says this, check your internet connection.
.png?width=593&height=115&name=image%20(10).png)
4. Connecting to your counter
Connect your tablet/computer to the internet.
Beware, the Weezbox does not provide access to the Internet.
If you have opted for the Weezbox's WIFI connection and you have connected to it to configure it, you will need to change your WIFI network to one that broadcasts the Internet properly.
- Open your web browser (Google Chrome, Safari) and enter the URL
https://kiosk.weezevent.com/ - Log in with the operator ID you created in your back office: Tools > Ticket office > My ticket office > Operator. Please note: only one operator per ticket office
- When you log in for the first time, select the No Print.
- Go to the counter settings: Select a printer, then select the configuration according to the ticket model (Zebra printer) or Member Card (Evolis printer).
The information displayed on the selected printer corresponds to :
- 900087: Printer serial number
- ZTC GX420D: printer model
- BOX E4:5F:01:80:60:52: WeezBox identification number
If you have connected several printers, check the printer serial number on the back of the printer.
5. Run Print Tests
- Once you have selected the printer and configuration, click Save.
- The configuration window opens. Wait until all the LEDs are green.
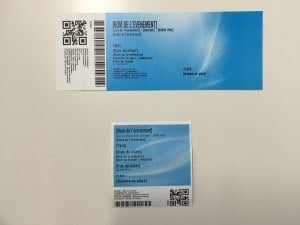
- Print a test ticket to check that the printer is correctly calibrated
If the configuration has been carried out correctly, your test tickets will come out with all the information on them:
If no test tickets print at this stage, you can reset your printer (Appendix 2) and restart the print tests.
APPENDIX 1. Connection to the WeezBox Interface
- Connect your computer/tablet to the WIFI network emitted by the WeezBox. It should look like this weezbox-XXXXXX. The 6 "X" represent its number.
- Log on to http://wzbx.weezevent.com/
The expected interface is as follows
|
|
If the rendering is this one, this implies you are not connected to the WIFI network emitted by the WeezBox.
APPENDIX 2. Installation of a Zebra Printer
Paper models available:
Three types of paper are available, depending on your use:
- Thermal counterfoil tickets
- Blue thermal roller
- Adhesive thermal labels (A6 badges)
Resetting the printer :
If the LED is not green, press and hold the button on the front of the printer until the LED flashes 4 times (the printer reset is shown in the video below). Release the button. Let the printer reset.
APPENDIX 3. Installation of an Evolis Printer
Ribbon installation and card thickness adjustment
- Open the top cover of the printer
- Insert a new ribbon flat, lugs towards you
- Set the card thickness dial to position 24
- Close the cover and leave the printer to its own devices
Loading cards into the printer :
- Open the housing cover (1 in photo)
- Insert the plastic cards (maximum 50) into the slot
- The cards must be printable side up (white side). If the card is perforated (so that it can be worn around the neck, for example), the hole must be on the right-hand side of the white face.
- Close the cover of the card slot
Configuring your counter
- Open your web browser (Google Chrome, Safari) and enter the URL https://kiosk.weezevent.com/
- Log in with the operator ID you created in your back office: Tools > Ticket office > My ticket office > Operator. Please note: only one operator per ticket office
- When you log in for the first time, select the No print option.
- Go to the counter settings: select your printer, then select Member Card
In case of configuration difficulties, contact your Project Manager, or Weezevent Customer Service on 01 86 65 24 00 (or 01 86 65 24 24 after 7pm and at weekends).
If your settings are correct, your printed test ticket should include all the information you expect: